1. Introduction
This is the documentation page of the HitMag Pro WordPress Theme. We will try to keep everything well documented. If you are not sure about any particular area of this please contact us. We give priority email support for our premium customers.
2. Theme Installation
- Theme installation process is same as others.
- Download the HitMag Pro theme zip file from https://themezhut.com/my-account/
- Go to Appearance > Themes in the WordPress Dashboard.
- Click on the Add New button.
- Click on the Upload Theme button on the top.
- Use Choose File button to select .zip file.
- Select the theme ‘zip’ file from your computer and click Install Now Button.
- After successfully installing the theme click “Activate Theme”.
Activating Theme License.
After the purchase, you should have received your License key to your email.
If you haven’t got it go to https://themezhut.com/my-account/and get your License key. You can reset your password if you have forgot your password.
Then navigate to “Dashboard > Appearance > Theme License” to enter your License key. After entering the License Key hit the “Activate License” button and “Save Changes” button.
Special Note: If you purchased your theme before 25th of March 2020, please read this – We changed our theme licensing / theme update system.
3. Import Demo Data
Note: This step is optional. This will reproduce the demo site in your own site with demo content.
To import demo data follow the steps below.
- First install and activate this plugin. – One Click Demo Import.
- Then go to Dashboard > Appearance > Import Demo Data.
- Click the “Import Demo Data” button.
You will have to wait few minutes until it imports the demo data.
4. Magazine Homepage
– Adding a magazine homepage.
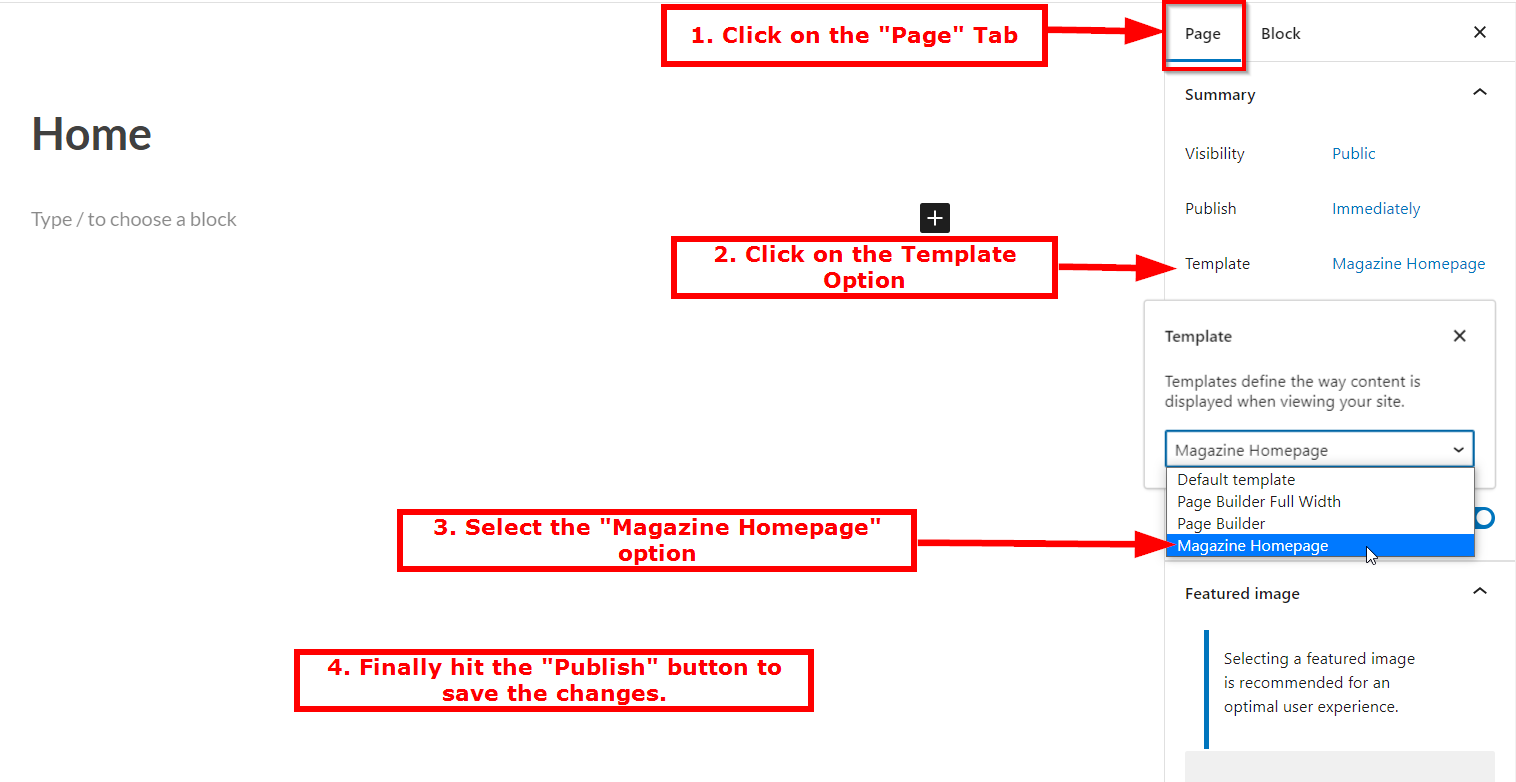
- Create a new page by going to Pages > Add New in the WordPress Dashboard
- Give the page a name whatever you want. eg : Home.
- Then select the “Magazine Homepage” option for the “Template” setting which is in the “Summary” section of the “Page” Tab Panel.
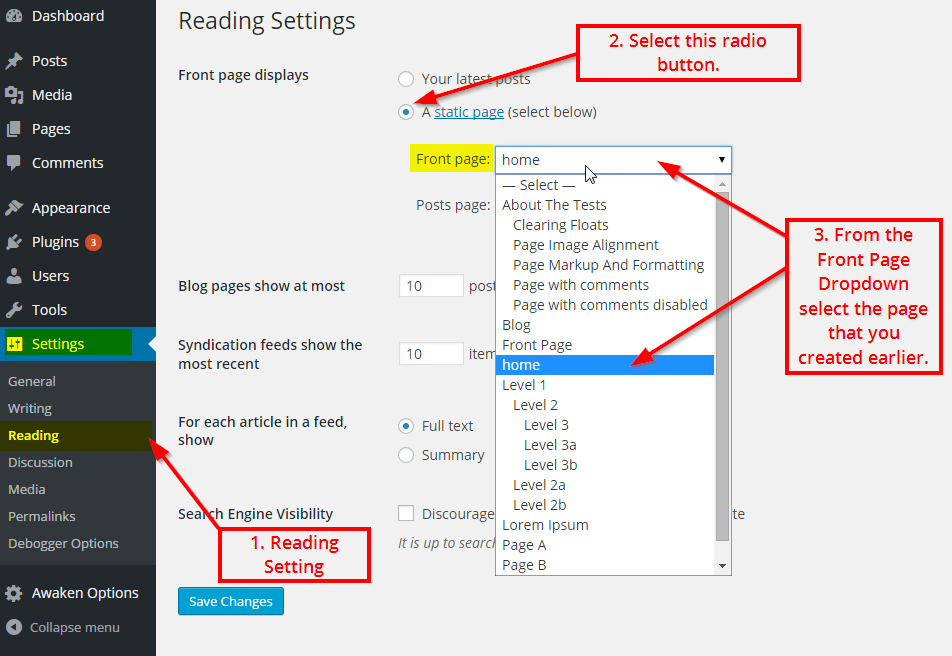
- Then Go to Settings > Reading in the WordPress Dashboard and select the “A Static Page” option which is under the heading “Front Page Displays”.
- Then Select the page that you created earlier from the “Front Page” drop down . eg: Home
– Adding a blog post page when magazine homepage is activated.
- Go to Pages > Add New in the WordPress Dashboard.
- Give it a name whatever you want. eg : Blog.
- Then from the page attributes options box select the Template as Default Template.
- Then Go to Settings > Reading in the WordPress Dashboard and select the option “A static page” which is under the heading “Front Page Displays”.
- Then Select the page that you created from the “Posts Page” drop down . eg: Blog.
Now you have created a “Magazine Homepage” to display posts widgets and “Blog page” to display normal blog posts. To display posts widgets in magazine homepage drag and drop Magazine posts widgets to “Magazine Homepage” widget area.
5. Widgets
There are 8 widgets bundled with HitMag Pro. To see widgets and widget areas navigate to Dashboard > Appearance > Widgets.
- Magazine Posts (Style 1) – Can be displayed in Magazine Homepage widget area, Main Sidebar and Footer Sidebars.
- Magazine Posts (Style 2) – Can be displayed in Magazine Homepage widget area, Main Sidebar and Footer Sidebars.
- Magazine Posts (Style 3) – Can be displayed in Magazine Homepage widget area, Main Sidebar and Footer Sidebars.
- Magazine Posts ( Image grid ) – Can be displayed in Magazine Homepage widget area.
- Magazine Posts ( List Posts ) – Can be displayed in Magazine Homepage widget area.
- Sidebar Posts – Can be displayed in Main Sidebar and Footer Sidebars.
- Popular posts, Comments, Tags widget. – Can be displayed in Main Sidebar and Footer Sidebars.
- Facebook like box.
6. Widget Areas
1. Magazine Homepage
2. Main Sidebar
3. Header Advertisement Area
4. Footer Left Sidebar
5. Footer Mid Sidebar
6. Footer Right Sidebar
Please go to Dashboard > Appearance > Widgets and add widgets to the relevant widget areas and arrange them in any order you want.
7. Add a Custom Logo
Adding a custom logo is very easy. To add a logo follow the steps below.
- Go to Customizer > Site Identity in the WordPress Dashboard. ( Dashboard > Appearance > Customize > Site Identity ).
- Then click on the “Select Logo” button which is under the “Logo” title. Then use the upload tab to upload a logo or select the previously uploaded logo from the popped up media library window.
- Now if you don’t want to show the site title and description text you can un-check the “Display site title and tagline” check box.
- Click “Save and Publish” button at the top.
8. Custom Main Menu
- Go to Appearance > Menus in the WordPress Dashboard.
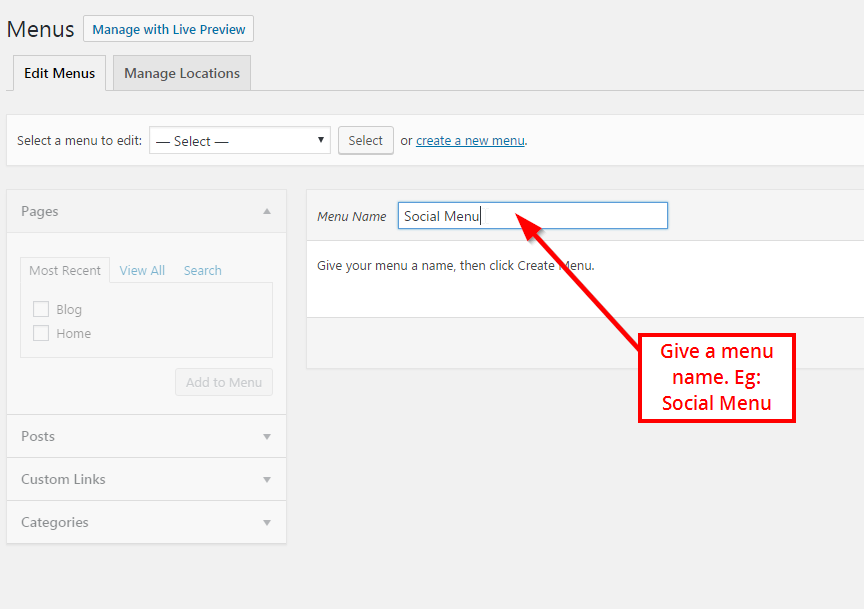
- In the edit menus tab click on the “create new menu” link.
- Give a Menu Name and click button “create menu”. For example if you are planing to use this as main menu type “Main Menu”
- Then you can choose/create the links from the tabs (Pages/Posts/Custom Links/Categories) which are in the left hand side of the screen.
- After Creating the menu select the Theme Location of the menu.(It’s under the Menu Settings which is in the bottom of the page. ) Select where you want to show this menu. Theme has three menu locations. ( Main Menu, Top Menu, Social Media Menu )
- Finally Hit Save.
Social Media Menu.
It is very easy to add a social media menu to your site top bar with HitMag Pro theme. Adding a social media menu is same as adding other menus as described above. Use custom links to add social media links ( eg: https://facebook.com/themezhut ) and select the menu location as “Social Media Menu”.
Use custom links to add social links.
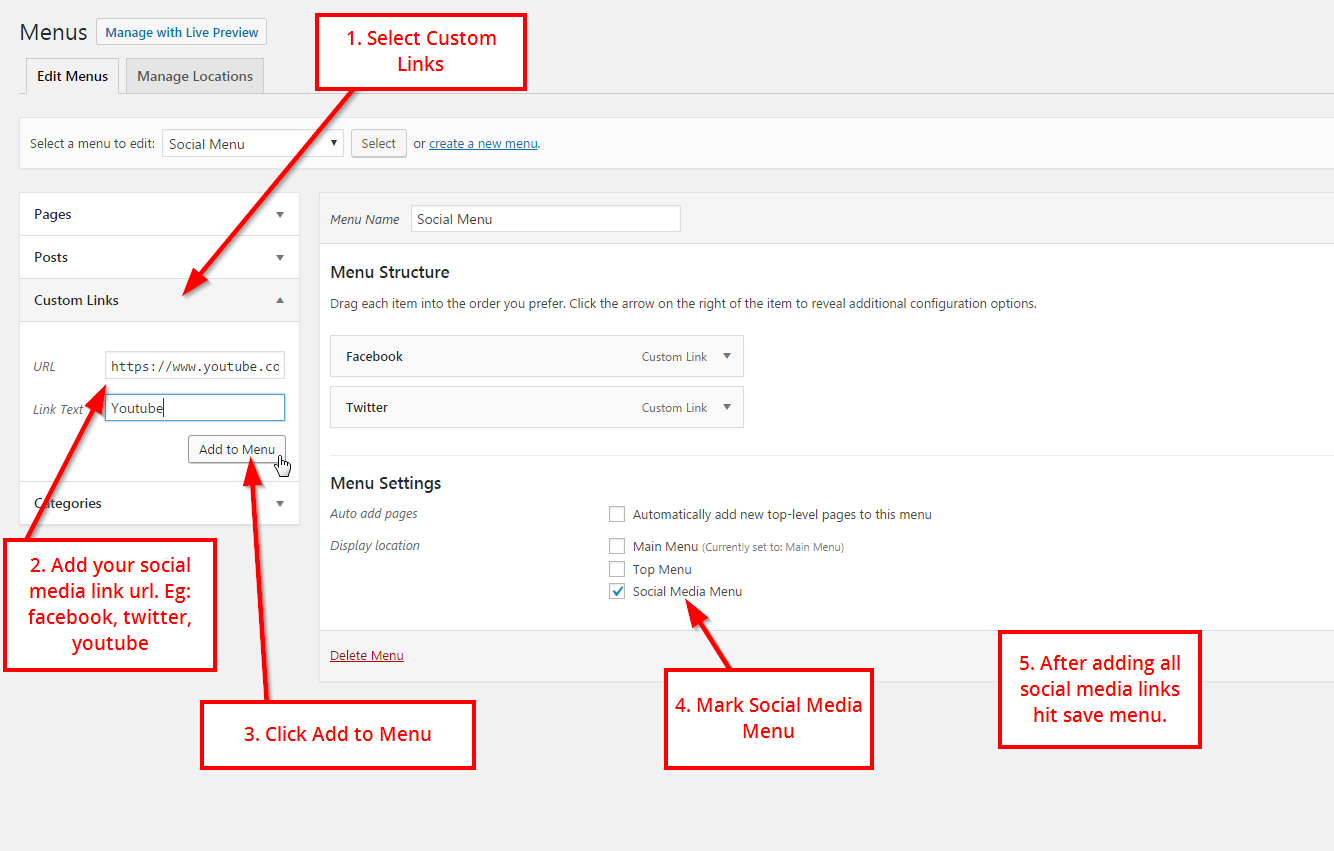
Now your social links will be displayed at the top bar of the site as shown in the demo.
9. Featured Images and Slider
Sometimes you may have noticed that when you upload featured images from posts they don’t have same sizes in the blog index page or magazine page. To fix that you can use the great regenerate thumbnail plugin to crop images. It will crop all the featured images of posts.
Activate slider
Note: You have to have activated the magazine homepage as described above, in order to display slider.
1. Go to Appearance > Customize > Slider Settings.
2. Switch On Featured slider.
3. Then select the category of posts which you want to display in the slider. ( Featured images of posts of the selected category will be displayed as slider images.
– Featured images of posts should be at least in width of 735px and in height of 360px to display slider images properly.
10. Supported Plugins.
HitMag Pro supports almost all major plugins. Theme has “built in” support for following plugins.
- Post Views Counter – This plugin can be used to display the posts views count with the post meta data.
- Font Awesome 4 Menus – Can be used to display font awesome icons in the main navigation.
- One Click Demo Import. – Can be used to setup your site exactly like the demo site.
- Elementor Page Builder.
- Site Origin Page Builder.
If you have any problem please contact us. We give priority email support for premium customers.