DOCUMENTATION MENU
- Introduction.
- Theme Installation.
- Add a Custom Logo.
- Custom Main Menu.
- Activate Slider / Featured Content.
- Magazine Template.
- Widgets.
- Widget Areas.
1. Introduction
This is the documentation page of the Arouse WordPress Theme. We will try to keep everything well documented. If you are not sure about particular area of this please use the support forum.
2. Theme Installation
- Theme installation process is same as others.
- Download the .zip file. ( Arouse Pro can be downloaded from https://themezhut.com/my-account/my-api-downloads/ after the purchase. )
- Go to Appearance > Themes in the WordPress Dashboard.
- Click on the Add New button.
- Click on the Upload Theme button on the top.
- Use Choose File button to select .zip file.
- Select the theme ‘zip’ file from your computer and click Install Now Button.
- After successfully installing the theme click “Activate Theme”.
Activating Pro version.
After the purchase, you should have received your License key to your email.
If you haven’t got it please go to https://themezhut.com/my-account/and get your License key. You can reset your password if you have forgot your password.
Then please navigate to “Dashboard > Appearance > Theme License” to enter your License key. After entering the License Key hit the “Activate License” button and “Save Changes” button.
Special Note: If you purchased your theme before 25th of March 2020, please read this – We changed our theme licensing / theme update system.
3. Add a Custom Logo
Adding a custom logo is very easy. Please use the following steps.
- Go to Customizer in the WordPress Dashboard. ( Appearance > Customize ).
- In the Site Identity section click on the “Select image” button which is under the Site tile and site tagline input boxes.”
Upload Your Logo and Click Select in the upload screen. - Just after the above setting there is a setting called “Display site title / logo”. Choose your preferred option from that setting.
- Click “Save and Publish” button at the top.
4. Custom Main Menu
- After just installing the theme it will display the pages as the default menu. You can add your own links, categories, pages for the menu.
- Go to Appearance > Menus in the WordPress Dashboard.
- In the edit menus tab click on the link “create new menu”.
- Give a Menu Name and click button “create menu”.
- Then you can choose/create the links from the three tabs(Pages/Links/Categories) which is in the left hand side.
- After Creating the menu select the Theme Location of the menu.(It’s under the Menu Settings which is in the bottom of the page. ) In this case tick the “Primary Menu”.
- Hit Save.
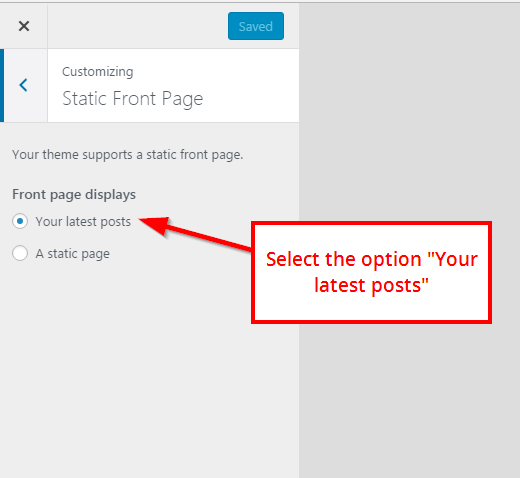
5. Activate Slider / Featured Content.
First of all you should have selected to display latest posts on Front page. Go to Appearance > Customize > Static Front Page and select “Latest Posts” option for the “Front Page Displays” setting.
Activate slider
1. Go to Appearance > Customize > Slider.
2. Check the ‘Display slider?’ check box.
3. Then select the category of posts which you want to display in the slider. ( Featured images of the posts of the selected category will be displayed as slider images.
– Featured images of posts should be at least in width of 1070px and in height of 500px to display slider images properly.
– Use regenerate thumbnail plugin to crop all the images.
4. If you are using Arouse Pro you can add custom images with custom titles and links. To use custom slider select the “Custom Slider” under the setting “Select slider Type”.
Activate featured content boxes.
1. Go to Appearance > Customize > Featured Content Boxes.
2. Mark the ‘Display featured content section?’ check box.
6. Magazine Template ( Only in Arouse Pro Version )
On Arouse Pro you can use the magazine widget area to display “Posts Block Widgets” in magazine style. Just Drag and drop following Posts Blocks to magazine widget area.
7. Widgets
Following are the widgets included in the theme.
Free Version Widgets.
- Arouse: Sidebar Posts.
- Arouse: Social Media Widget.
Pro Version Widgets.
- Arouse Pro: Posts Block ( Style 1 )
- Arouse Pro: Posts Block ( Style 2 )
- Arouse Pro: Posts Block ( Style 3 )
- Arouse Pro: About Me widget.
- Arouse Pro: 300×250 Ad
- Arouse Pro: 728×90 Ad
- Arouse Pro: Facebook Like Box
- Arouse Pro: Sidebar Posts
- Arouse Pro: Social Media Widget.
8. Widget Areas
1. Magazine
2. Main Sidebar
3. Footer Left Sidebar
4. Footer Mid Sidebar
5. Footer Right Sidebar
Drag and drop each widget to the relevant widget areas and arrange them any order you want.