1. Introduction
This is the documentation page for the HybridMag WordPress theme.
2. Theme Installation
- Visit your site’s dashboard.
- Navigate to Appearance → Themes.
- Click on the “Add New” button at the top.
- Then enter the text “HybridMag” in the “Search themes” search input.
- When the theme “HybridMag” appears, hover over it to find the “Install” button. Click on the Install button and then click on the “Activate” button.
3. HybridMag Pro Installation
“HybridMag Pro Addon” is a plugin developed to extend the features of the HybridMag WordPress theme. Upgrading to Pro will not affect your current content, settings, or design—everything will remain intact while unlocking additional premium features. So you can upgrade your site without any hassle.
After purchasing the “HybridMag Pro Addon” plugin you will be able to instantly download the hybridmag-pro-addon.zip file. And further you can access all of your downloads and license keys from https://themezhut.com/my-account/
- Download the hybridmag-pro-addon.zip plugin file.
- Navigate to Dashboard → Plugins.
- Click on the “Add New Plugin” button at the top.
- Then click on the “Upload Plugin” button at the top.
- Then click on the “Choose File” button and locate the downloaded “hybridmag-pro-addon.zip” file on your computer.
- After selecting the file click “Install Now” button to install the plugin.
Pro Plugin Activation
- After installing the “HybridMag Pro Addon” plugin navigate to Dashboard → Plugins → HybridMag Pro Licence.
- Then enter the license key in the input field and click the “Activate License” button.
- Then click on the “Save Changes” button.
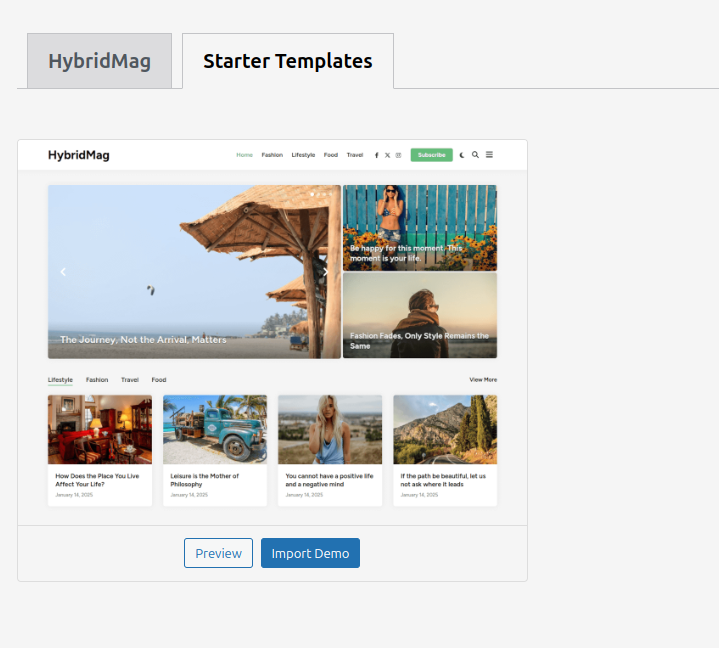
4. Demo Installation.
Follow the steps below to install demos ( Starter Templates ).
- Go to Dashboard→ Appearance →HybridMag Theme.
- Click on the “Starter Templates” tab.
- It will ask you to install our “Magazine Companion” plugin to install demos. Click on the “Install & Activate” button to install the plugin.
- Click the button “Import Demo” to import the demo.
- If your website is not a fresh WordPress install or if your website already have filled with content you don’t need to install demo content. If you already have content on your website “unmark” the checkbox “Import Demo Content” and then click the “Import” button. However since some of our demo homepages have directly built within pages, it will not import these pages if you “unmark” this.
- Please note that you might have to wait about 5-10 minutes until it imports the demo.
- After installing the demo you can customize your website as you need.
5. Adding a Custom Logo
- Go to Appearance → Customize → Site Identity
- Click on the “Select Logo” button which is under the “Logo” title.
- After selecting or uploading the logo image it will take you to a screen where you can crop the image as you see fit. If you do not want to crop the logo image proceed by just clicking on the “Skip Cropping” button.
- After adding a logo image there will be two controls to set the logo Max width and Max height in the site identity section of the customizer, just below the “Logo” control. These controls give you the option to choose different logo sizes for different devices.
6. General Settings
There are 3 main sections under General Settings panel.
- Site Layout
- Breadcrumb
- Site Styling
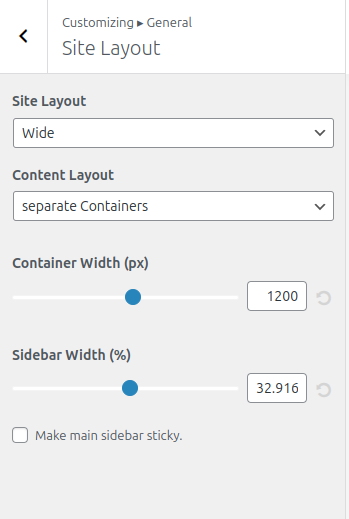
1. Site Layout Settings.
Site Layout
Site layout control has two options, Boxed Layout and Wide Layout. Boxed layout means the whole site displays in a boxed container whereas the wide layout option takes the whole width of the browser.
Content Layout
“Seperate Containers” is the default layout content layout. That means all sections have it’s own container making the area of the section visually highlighted. Next option “One Container” means sections are separated only by the spacing of each section.
Layout Width
Layout width gives you the ability to change the container width of the site layout.
Sidebar Width
When you give a sidebar width it applies to the posts or pages those displays the main sidebar.
2. Breadcrumb
HybridMag supports breadcrumb navigation by integrating with the following popular WordPress plugins:
- Yoast – Breadcrumb feature integrated with Popular Yoast SEO plugin.
- Breadcrumb NavXT
- RankMath – Breadcrumb feature integrated with Popular RankMath SEO plugin.
Please note that you must have installed and activated the chosen plugin in order to work the chosen breadcrumb option.
3. Site Styling
Site styling section contains styling options for your site.
7. Header Settings
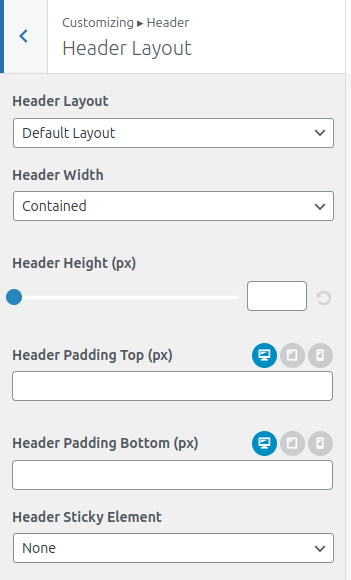
Header Layout
You can change your site’s header layout by navigating to Appearance → Customize → Header → Header Layout
Header Layout
There are two header layouts for you to choose from.
- Default Layout – Displays the the site branding and the primary menu next to each other in a single line.
- Large Layout – Displays the primary menu below the logo.
Header Padding
You can use the Header Padding Top and Header Padding Bottom controls to change the height of the header. You can add values separately for desktops, tablets and mobiles.
Header Sticky Element ( PRO )
Select the header element that you want to be sticked to the top when the user scrolls down. If you select the option “Header“, whole header will be sticky. If you select the “Menu” option, only the menu will be sticky.
Social Menu – How to add a social Menu?
You can display a social menu at the Top Bar of the header. To create a social menu using the customizer please follow the steps below.
- Visit your site’s dashboard.
- Navigate to Appearance → Customize → Menus.
- If you see a Social menu has already been created, you can click it to begin editing. If not, click “Create New Menu” instead and type in a name, such as “Social” for example.
- After giving a menu name make sure that the checkbox for “Social Menu” is checked under “Menu Locations:”
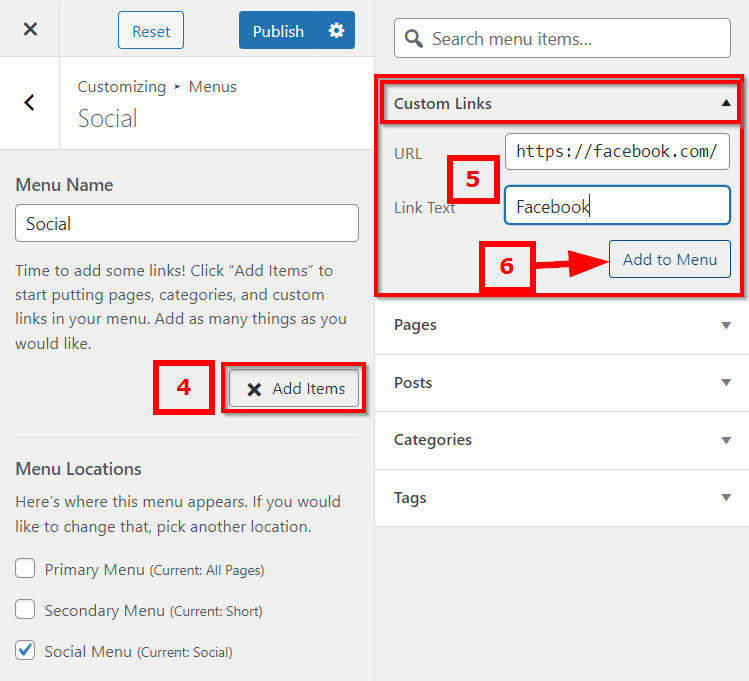
- To add your first social media link to the menu, click + Add Items:
- Next, select the “Custom Links” menu item type.
- Here, fill in the two fields:
- URL: Add the link address for one of your social media profiles. For example, if the link to your Facebook profile is https://www.facebook.com/ThemezHut, you would paste that into the URL field.
- Link Text: Type a name for the social media site, such as Facebook or Instagram.
- Once you have filled in both fields, click “Add to Menu“.
- Repeat the above steps until all the social media profiles you wish to use have been added to the menu.
- Finally, click Save Changes. Check your site to see your brand new social media icons!

Important Notice: If you have any questions or concerns regarding the HybridMag theme or the “HybridMag Pro Addon” plugin please do not hesitate to contact us. Or please leave a comment below.